How to Draw Anime Weapons
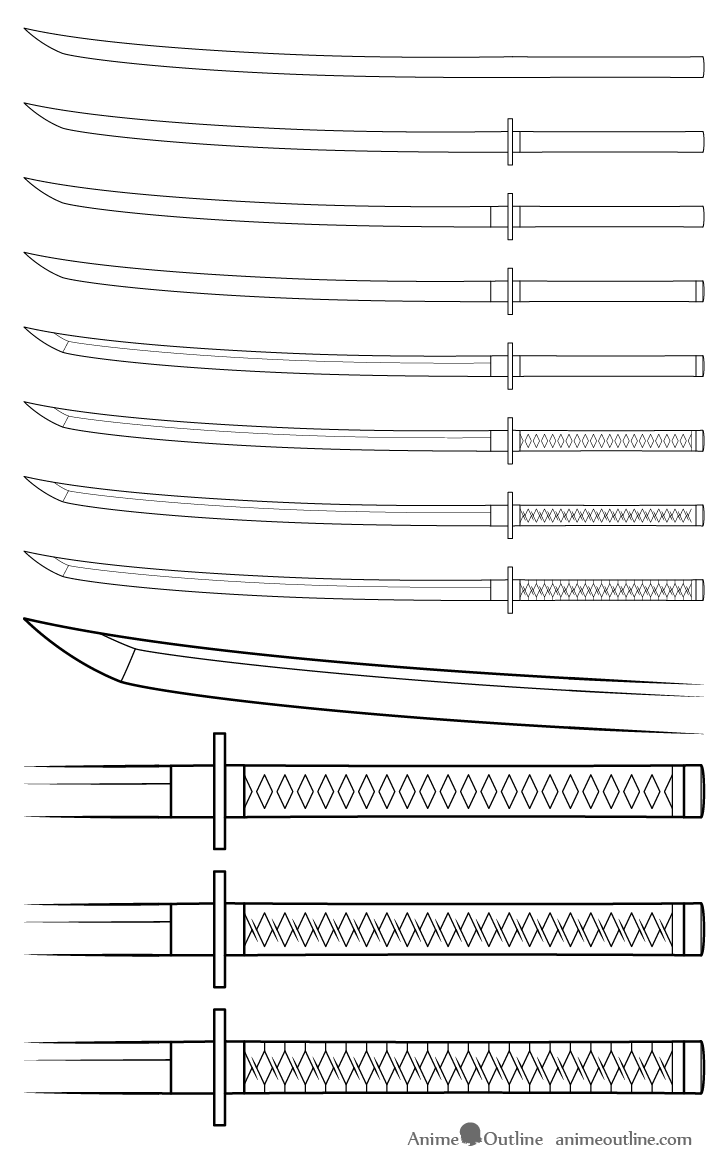
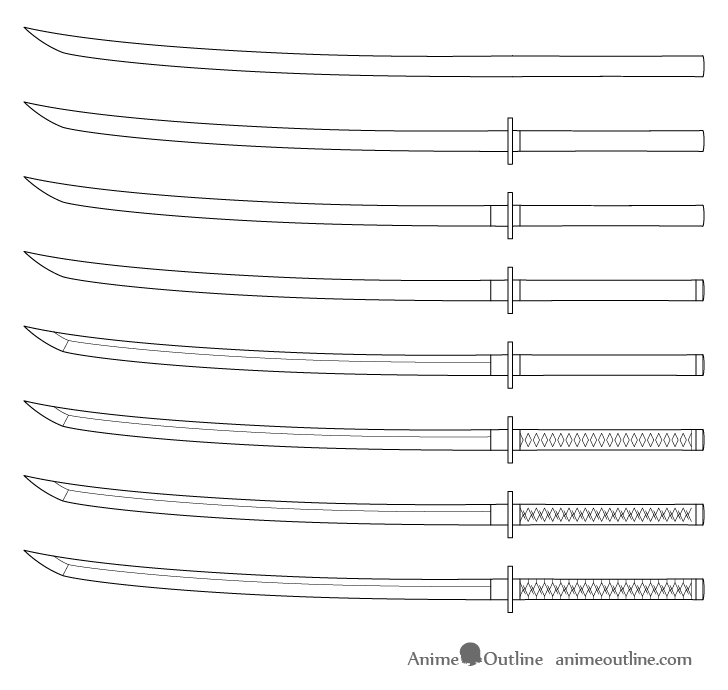
This tutorial shows how to draw a Katana in eight steps with illustrated examples and a detailed breakdown of the various parts of the sword.

A katana is probably is one of the most commonly seen weapons in anime and manga. Drawing one is not very difficult but it can be helpful to know it's various parts.
The examples in this tutorial are of the side view of the katana. This view makes it easy to see most parts of the sword and is also fairly easy to draw from.
Step 1 – Draw the Outline of the Katana

Start by drawing the combined shape of the katana's blade and handle. Basically an outline of it's silhouette.
The blade portion of this shape should be slightly curved with the tip pointing in the direction of that curve.
Step 2 – Draw the Hand Guard

Dividing the handle form the the blade draw the hand guard. As the name suggest it protects the hands from slipping onto the blade.
The hand guard on a katana is generally fairly thin and not very wide. Draw accordingly and erase the part of the sword overlapped by it after you are done.
Step 3 – Draw the Blade Collar

The blade collar is used to lock the sword in the sheath. From this view it will pretty much be the same width as the blade so you can make a simple divider line to show it's length.
Step 5 – Draw End Cap/Pommel

The pommel is located at the very end of the hilt and is basically a cap on it. In katanas the end cap is generally about the same size as the handle part. You can simply define it with a line same as the blade collar.
Step 5 – Define the Blade Edge

In this case we will add a very large edge found in some types of katanas. Draw the curve of the edge tracing the curve of the blade.
Step 6 – Draw the Hilt Wrap Braid

Katanas usually have a braid like wrap along their hilt. To draw this pattern add a set of evenly spaced rhombus shapes along it.
If you are planning to make a fairly small drawing then you can omit the rest of the details of the handle wrap and stop at this stage. Animators and manga artists can also sometimes do this to just to save time.

If you want to make a more detailed drawing of the hilt then you can move on to the next step.
Step 7 – Draw the Handle Braid Folds

The braid of the hand wrap will generally create some folds.

You can show the folds as in the example above by drawing some lines from the tips of the rhombuses that are facing towards one another (as in the example above).
Step 8 – Finish the Katana Drawing

Finally to finish the hand wrap and the drawing add some split lines from the top and bottom edges of the rhombuses.

These lines will finish the "wrap effect" as shown in the example above.
With this you should be done making a line drawing of a katana.
Conclusion

Katanas are a very common weapon in anime and manga. This tutorial shows the basics of drawing one but of course there is a lot more to it (such as drawing swords from various angles). There are also other types of katanas that look different from the example of this tutorial. However generally these swords consist of the parts listed in the examples and you can apply a similar step by step method to drawing them.
For a tutorial on hands holding various objects (including a sword) see:
6 Ways to Draw Anime Hands Holding Something
For more anime style weapons see:
How to Draw a Shuriken (Ninja Star) Step by Step
Source: https://www.animeoutline.com/how-to-draw-a-katana-step-by-step/
0 Response to "How to Draw Anime Weapons"
Post a Comment